Hanmade in Cornwall

Hanmade in Cornwall

Thursday 28 April 2016

Hanmade lampshade slip cover

Oh my word, I have loved this project. It has been on my to do list for a while. And I've done it! Yay!
I found a cheap £2 reduced lampshape and waited for the perfect fabric for the job. I remembered about some tractor fabric I had stashed away and knew my almost 2 year old would love it. I had thought for a while which would be the best way to make the lampshade cover. I had seen lots of ways using glue, but as a sewer knew, surely there would be another way!
This tutorial helps you make a 'slip' to cover the current lanpshade. So if you change your interior you can slip this cover off and make another.
If you want a quick and simple project. This is for you. It took me less than an hour.

Are you ready? Lets begin. 

Grab your lampshade, pencil and greaseproof paper. 
Put the lampshade onto the paper and follow the top line of the lampshade rolling it round creating a pencil line. Repeat for the bottom line. 
Cur out your template. 

Lay your template onto your fabric. 
Cut round the template. 
*now then, I cut round giving myself a good 1cm allowance all the way round. As it turns out I'm pleased I did. And would did it again next time. So give yourself allowance around every side.

Wrap your newly cut fabric around your lampshade - inside out. 
Gather the raw edges together (don't overlap them) and pin along the surface of the lampshade. 

Take it off the lampshade. 
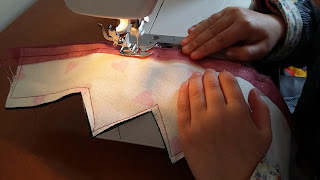
Sew along the pinned line. 

Turn it round the right way. 
Slide onto your lampshade. 
Looking good so far! 

Remember we added 1cm to the edges? Here is why. There are options of how to finish the top and bottom edges off. 
Im going to both on my lampshade. 

First option which I did on the top edge. With the fabric on the lampshade fold the edges back into themselves (but make sure its not on the lampshade itself) and pin into place. 

Second option
To make some binding to cover the raw edge. This is neat but bulky. 

Here you can see I have a binded bottom edge and a folded over top edge. All pinned into place. 
Choose how you are going to finish your edges. 
Sew your edges.

Look all sewn up. 
Wasn't that simple?! 
Now put into place, turn the light on and admire your handy work. 


I have really enjoyed this project. Minimal sewing with a brilliant outcome and so effective. 
My little boy loves his new lampshade. 

Im waiting on which lampshade will get it next! 


Tuesday 19 April 2016

learn to sew - lesson 7 sew a crown


Today is a project that my daughter had to make for school. A crown to celebrate the Queen's 90th birthday! Everyone has to make and wear a crown to school.
Why cut and stick when you can sew?! 
And as an extra we could do it as a sewing project together. My daughter loved the idea.... so, lets get started. 

measure around the head for the crown. 
we choose some felt and heart fabric. 
Cut the crown shape from the fabric. 

Get your machine ready, my little lady loves trying to thread the machine. 

Sew the fabric onto the felt. Following the edges round. 

Then trim the felt from the fabric.

We found some sparkly pink ribbon that we folded over the bottom edge and stitched onto the bottom of the crown. 

we added more ribbon and a heart to our design. 
You can add buttons, flowers or anything else you would like. 

Bring the short edges together, overlap them, pin  and sew down. 

Your done. One sweet crown made and ready to be worn. 


Perfect. This was a great little project whigh I would reccomend, as it was quite quick and easy to put together but fin to embellish which my daughter enjoyed. 
So to recap some of the things we have practiced today: 
threading the sewing machine, choosing felt, fabrics and ribbons, sewing along the fabric jn straight lines with some pivoting, adding the embellishments, we also did some zig zag stitch (because we could!) and pinning. 

Well done prince and princesses - enjoy your new fabric crowns 

*** since posting this, my daughter enjoyed wearing her crown to school. Then when collecting her at the end of the school day to find she won the 'make a crown' competition! 


Monday 18 April 2016

Hanmade fabric bible cover

I really need to cover my Bible. I wanted something simle and not cheesy.

Follow these steps to work alongside me.

So after searching through my stash I found the right fabric.

Hem the side seams. Here they are pinned here. 

Add decoration to the front/ back now. 

Now you need to fold over the ling sides. I did this twice so the raw edge if folded away. 
Use your iron to help you with this. 
Work out where you need to fold the sides in. Press them down with the iron. 

With the sides folded in, sew along the top and bottom edge. 

All sewn. 
Now insert your Bible. 
Tada! 
A quick lunchtime project, done! 


Learn to sew - lesson 6 scented fabric heart

I hope your enjoying your sewing practice.
Today we are going to sew a small stuffed heart.
Cute and simple and perfect for any almost 6 year old.

We started by making a heart shape on some cardboard. 
Cut it out. 

Draw around the template twice in your fabric. 

you can see the heart line. 

pin your hearts wrong sides together. 

Start to sew aling the line. We put in a pin where to start and finish sewing. Make sure you leave a good size gap for later. 
Where you want the ribbon to go insert it into the fabric with the loop on the inside. Sew over the top. 

sew on the lin. And then trim (I did this part) around the heart. Where the gap is give abit more fabric. 

Now turn the heart the right way round. 

Its taking shape! 

we wanted to add some lavender in, so we started with that.

Than adding the stuffing until its in around all the sides and you feel its full enough. 

Now for some hand sewing. 
So choose the thread. 
Thread the needle. 
Double thread and knot the end. 
Insert needle and start in and out on the gap of your fabric. 
My daughter did all of this without me telling her what to do! She is loving threading the needle and getting on with it! 

There we go! 
Great job sewers! 


Check out lesson 7 - here


Thursday 14 April 2016

Learn to sew - Lesson 5 hand sewing

Well what a great few weeks sewing we have had. How has your sewing been going?


Today we are going to move on.... and do some hand sewing.
Hand sewing is a great skill to have. Whether its sewing on a button or fixing a seam.
So thats what we are going to learn about and put into practice today.

Trying this out will help with threading a needle, accuracy with sewing, stitch length and funishing off. We will also add a button or two.

I started off explaining about having a double thread for a stronger stitch. 
I got my daughter to thread the needle!- she did it! And to tie a knot in the end. She enjoyed all of this. Then thread it through starting at the back of the fabric, bring it through to the right side. Now your ready to begin. Going in and out teying to keep equal distance as you go. 
And keep going. 
Why don't you change thread colour. 
And keep going. 

My daughter then tried her initials. 
Looking good. 

Then time to add a button. 
The hard bit os choosing a button! 
So thread your needle with a knot at the end. Do a few stitches where you want the button to be. Then put the needle through one of the button holes and through the other button holes. Then through the fabric. Repeat this a few times. 
Once its secure. 
Take hold of the needle and wrap the thread round the base of the button between the button and fabric. Wrap it a couple of times. Then push the needle through the fabric under the button. Then finish by doing a few stitches at the back. 
Done! God job. 
My daughter kept going and added another button, why not?! 

Move onto lesson 6 - here


Saturday 9 April 2016

Hanmade denim skirt

Everyone needs a denim skirt, or two! Its been in mind to make for a while and Ive finally done it!
So today Im showing how easy it is to reuse that old pair of jeans (or any trousers - Ive done it to cords and linen trousers before) to make a skirt.

So cut your trousers. I cut mine around the knee. Making sure you give yourself enough fabric to heam the bottom of the skirt - so dont cut it where you want the skirt to ginish ( unless your going to leave the rdge raw) 

Unpick the seams of the leg. 
Press those seams open. 

then grab your pins and start tucking over the middle part of the trouser so it sits flat. Pin all into place. 

cut out triangle shapes of the left over leg. Pin these into place. 
Sew all those edges. 


put the skirt on. Measure where you want the bottom of the skirt to be.
I wanted a nice neat edge to my skirt. So I ironed and pinned the heam up. 
Sew along that edge. 
Thats all there is to it! 
Done. 
You can also do this to kids trousers too! 


Now these jeans will be worn rather than stashed at the bottom of my wardrobe!