Hanmade in Cornwall

Hanmade in Cornwall

Monday, 18 April 2016

Learn to sew - lesson 6 scented fabric heart

I hope your enjoying your sewing practice.
Today we are going to sew a small stuffed heart.
Cute and simple and perfect for any almost 6 year old.

We started by making a heart shape on some cardboard. 
Cut it out. 

Draw around the template twice in your fabric. 

you can see the heart line. 

pin your hearts wrong sides together. 

Start to sew aling the line. We put in a pin where to start and finish sewing. Make sure you leave a good size gap for later. 
Where you want the ribbon to go insert it into the fabric with the loop on the inside. Sew over the top. 

sew on the lin. And then trim (I did this part) around the heart. Where the gap is give abit more fabric. 

Now turn the heart the right way round. 

Its taking shape! 

we wanted to add some lavender in, so we started with that.

Than adding the stuffing until its in around all the sides and you feel its full enough. 

Now for some hand sewing. 
So choose the thread. 
Thread the needle. 
Double thread and knot the end. 
Insert needle and start in and out on the gap of your fabric. 
My daughter did all of this without me telling her what to do! She is loving threading the needle and getting on with it! 

There we go! 
Great job sewers! 


Check out lesson 7 - here


Thursday, 14 April 2016

Learn to sew - Lesson 5 hand sewing

Well what a great few weeks sewing we have had. How has your sewing been going?


Today we are going to move on.... and do some hand sewing.
Hand sewing is a great skill to have. Whether its sewing on a button or fixing a seam.
So thats what we are going to learn about and put into practice today.

Trying this out will help with threading a needle, accuracy with sewing, stitch length and funishing off. We will also add a button or two.

I started off explaining about having a double thread for a stronger stitch. 
I got my daughter to thread the needle!- she did it! And to tie a knot in the end. She enjoyed all of this. Then thread it through starting at the back of the fabric, bring it through to the right side. Now your ready to begin. Going in and out teying to keep equal distance as you go. 
And keep going. 
Why don't you change thread colour. 
And keep going. 

My daughter then tried her initials. 
Looking good. 

Then time to add a button. 
The hard bit os choosing a button! 
So thread your needle with a knot at the end. Do a few stitches where you want the button to be. Then put the needle through one of the button holes and through the other button holes. Then through the fabric. Repeat this a few times. 
Once its secure. 
Take hold of the needle and wrap the thread round the base of the button between the button and fabric. Wrap it a couple of times. Then push the needle through the fabric under the button. Then finish by doing a few stitches at the back. 
Done! God job. 
My daughter kept going and added another button, why not?! 

Move onto lesson 6 - here


Saturday, 9 April 2016

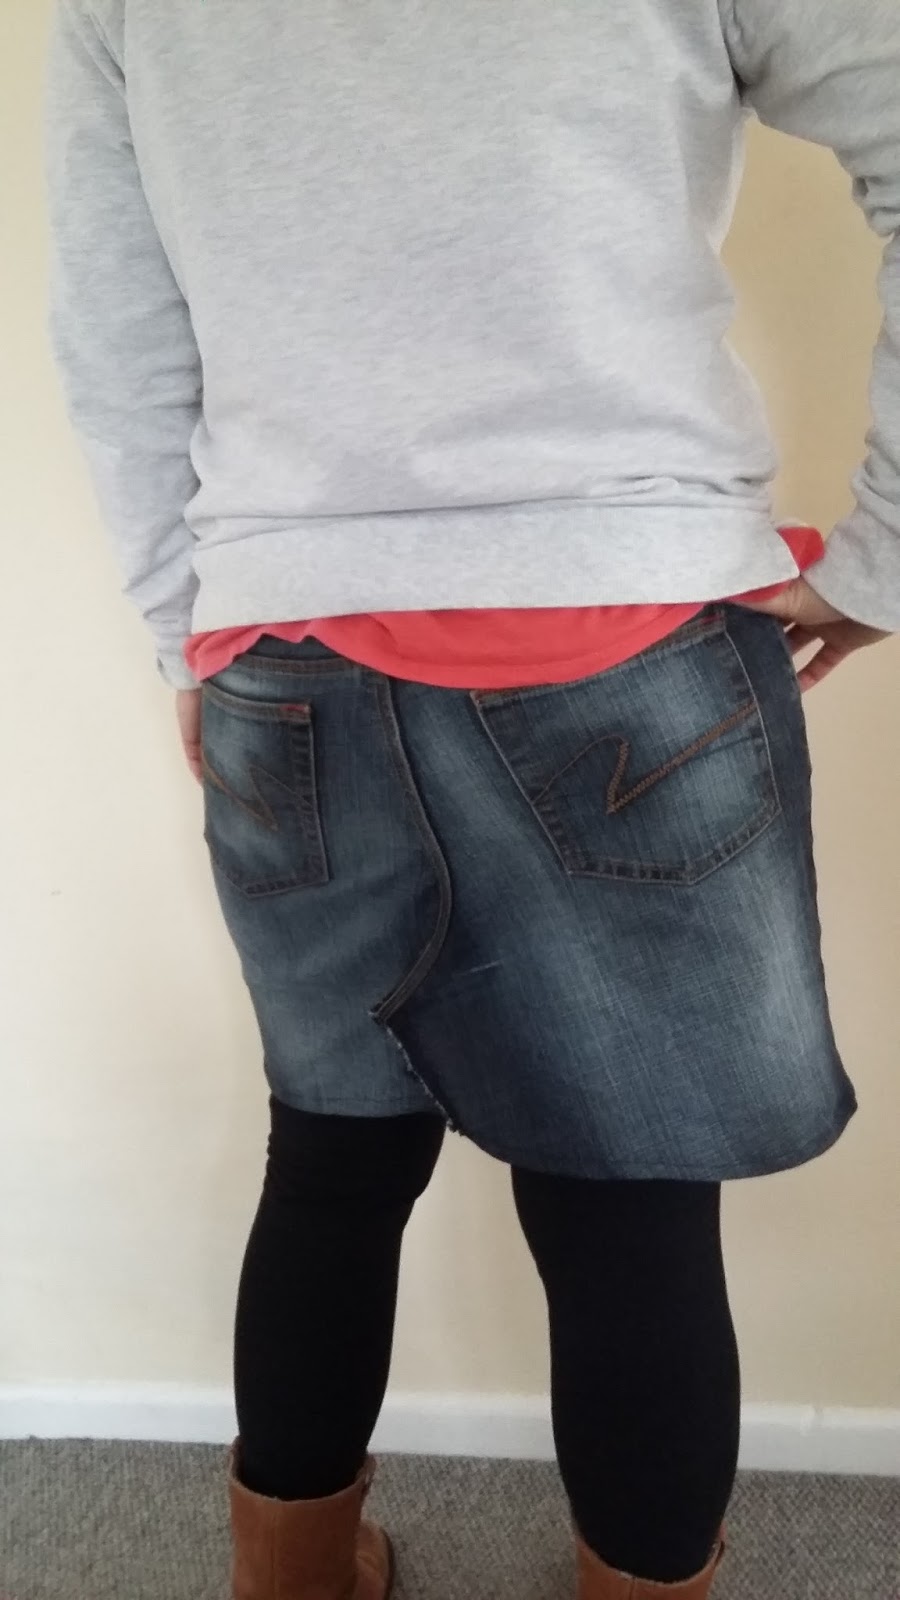
Hanmade denim skirt

Everyone needs a denim skirt, or two! Its been in mind to make for a while and Ive finally done it!
So today Im showing how easy it is to reuse that old pair of jeans (or any trousers - Ive done it to cords and linen trousers before) to make a skirt.

So cut your trousers. I cut mine around the knee. Making sure you give yourself enough fabric to heam the bottom of the skirt - so dont cut it where you want the skirt to ginish ( unless your going to leave the rdge raw) 

Unpick the seams of the leg. 
Press those seams open. 

then grab your pins and start tucking over the middle part of the trouser so it sits flat. Pin all into place. 

cut out triangle shapes of the left over leg. Pin these into place. 
Sew all those edges. 


put the skirt on. Measure where you want the bottom of the skirt to be.
I wanted a nice neat edge to my skirt. So I ironed and pinned the heam up. 
Sew along that edge. 
Thats all there is to it! 
Done. 
You can also do this to kids trousers too! 


Now these jeans will be worn rather than stashed at the bottom of my wardrobe! 

Thursday, 7 April 2016

Learn to Sew - lesson 4 drawstring bag


Here we are at lesson 4 already. I hope your doing well and have enjoyed what you have learnt. 
My daughter has! 
And because of that we are moving on, I hope your ready! 
So today come our first proper project. The drawstring bag. 
This is a great starter project. With a few processes in and some straight lines to sew. With a great result. 
So lets get started. 

This bag is going to be lined.
 So grab your fabric and cut the front, back and lining cut out of your chosen fabric. We chose a tectangular shape. Not too big. Yours could be squared. Each one needs to be exactly the same size.

You need to pin your lining fabric together. Put the pins in equal places. We did this 2" from the top. You are going to sew from pin to pin. 
Repeat this step with your patterned fabric. 

Next press open the seams. 
Here you will see at the top you have abit left open. 
Perfect. Repeat your ironing with the lining fabric. 

busy busy!!

now you need to sew a 'V' shape.
I penciled it onto the fabric. So my daughter could sew the dots. 
Repeat this exactly on the pattern fabric.  

A great opportunity to try and thread the needle. 
Second attemp and she did it! 

Stuff the lining fabric into the pattern fabric. No you can see it taking shape. 
right, more pining. 
Pin the lining and pattern fabric together at the top. Lining up the edges together. 
Sew along the top. Joining the two fabrics together. 

Now back to the iron and press the top down. 


and fold over again. 
So the top edge that you sewed is tucked under. 

Now pin the final fold into place. 
Sew along the edge as close to the bottom as possible. You are now creating the tunnel for the ribbon. So you want as much space as possible. 

sewn into place, hooray! 
Its looking good. 

here you can see the tunnelz for the ribbon and where the 'V' shape was sewn. 

Next is more fun, choosing the ribbon. 
Mg daughter couldnt chose one, so two it was! 
Thats fine! 

Put a safety pin on the ribbon and push it through one side of the tunnel and through the other tunnel. Take the safety pin off. 
Now put tbe safety pin on another ribbon. Push it through the other tunnel and push it through both. 
Tie the ends. 

You should have ribbon going both ways - if that makes sense?! 

test it out. 
Yay, it works! 
One happy lady. 
What a good job. 

My daughter did all the sewing herself. 
So what have we done today;
chosen fabric, done lots of ironing and pinnng, sewn in lots of straight lines plus the 'V' shape, chosen ribbon, used safety pin and pushed through tunnels. 
We have practiced some great skills today - well done. 


I hope you like your new bag. 
The great thing about these bags is you can make them as big as you want. The perfect PE bag or laundry bag. Or smaller for little treasures. 
This is also great as its lined, for extra durability and neatness. And so very simple. 
Thanks for checking out lesson 4. 
Let me see your drawstring bag. 
Happy sewing :-) 

Sew your way to lesson 5 - here


Saturday, 2 April 2016

Learn to sew - lesson 3 applique

So how are you getting on? I hope your doing lots of practicing!?

Today is about more practicing!yay! Its all part of it so bear with me.


I ask her where the presser foot is & needle. Asking questions as we ho along to make it familiar as possible.
With a new piece of fabric the practicing begins.
I say its up to you what you do. But maybe start by following the piece of fabric. So she sews around the fabric.
Pivoting around the corners. She likes this bit and its great *practice* at using the presser foot a lifting up and down the needle wheel.
 We then move on. I explain about stitches. She has been using a med straight stitch. But that can be made longer or shorter.
And the stitches can be different. (Depending on your machine) so I show her the different stitches. And she gets excited! So I give her the option of what to choose and let her go with it.

she tries lots out and enjoys it.
 Whilst this is happening she is always in control of the machine, going at her own pace, making her own decisions of what to do. And shes creating! Getting more confident as she goes. 
Success! 

But there is more!... 
ready for a small project. 

We are going to do some applique. 
I show her my bag of scraps and say she can choose a few fabrics that we are going to cut shapes out of. 
She loved choosing her own colours and patterns. 
Next we iron the chosen fabrics. 
Cut into shapes.
Arrange the shapes on a piece of fabric. 

 Next part is pinning the shapes onto the fabtic. She definetly needed help with this bit. I showed her what to do. And she gave it ago. She found ot hard bringing the pin through. But we kept with it.
 Our shapes are looking good!
 She was keen to get started. So she began takjng one shape at a time sewing each one on. This is a great excercise to do. As there is alot of stopping and starting. Needle in and out and cutting the thread and moving onto the next shape.
 It took her two sessions to complete all the shapes. I try and give her room when she says she needs a break
 I dont want to over kill the whole sewing thing.

She uses straight stitch all the way round each shape. 
And its complete, tada! 

A round up from today: 
continued pivoting round corners, 
following the fabric doing straight lines,
we have tried out new stitches,
Choosing fabric, 
pinning fabric shapes to fabric, 
stitching shapes onto fabric (lots of stops and starts) 
Controlling the needle wheel. 
Phew a good days work!

What are you going to applique? 
Or you could try stitching your initials?

Next time... 
our chosen project is to make a drawstring bag! 
So cute! 
Watch this space :-)

For lesson 4 - go here


Monday, 28 March 2016

Learn to sew - Lesson 2


I hope you enjoyed the first lesson. Today is a similar lesson. 
Turn your machine on and familiarise yourself with the functions: pedal, pressure foot& needle. Once your sewing machine is threaded. Choose your fabric. 

When your fabric is secured with the needle in the fabric you can start a straight stitch. 

Follow the side of the fabric. 
When you get to a corner, leave the needle in the fabric, pressure foot up and pivot the fabric round. Pressure foot back down. Hands in place and start sewing again. 

Repeat this as much as you want. 
This is great practice; sewing along the length of the fabric and pivoting round a corner. 

We also learnt about using the reverse button. Keeping your hands in place, whilst pressing the reverse button and using your pedal - all at once. 


Today we have practiced:
My daughter is loving deciding where to see. Doing corners, straight lines and learning the reverse button. 

Happy Sewing :-) 

Lesson 3 here